Dyuichi Blog
Terraformについて
Terraformとは
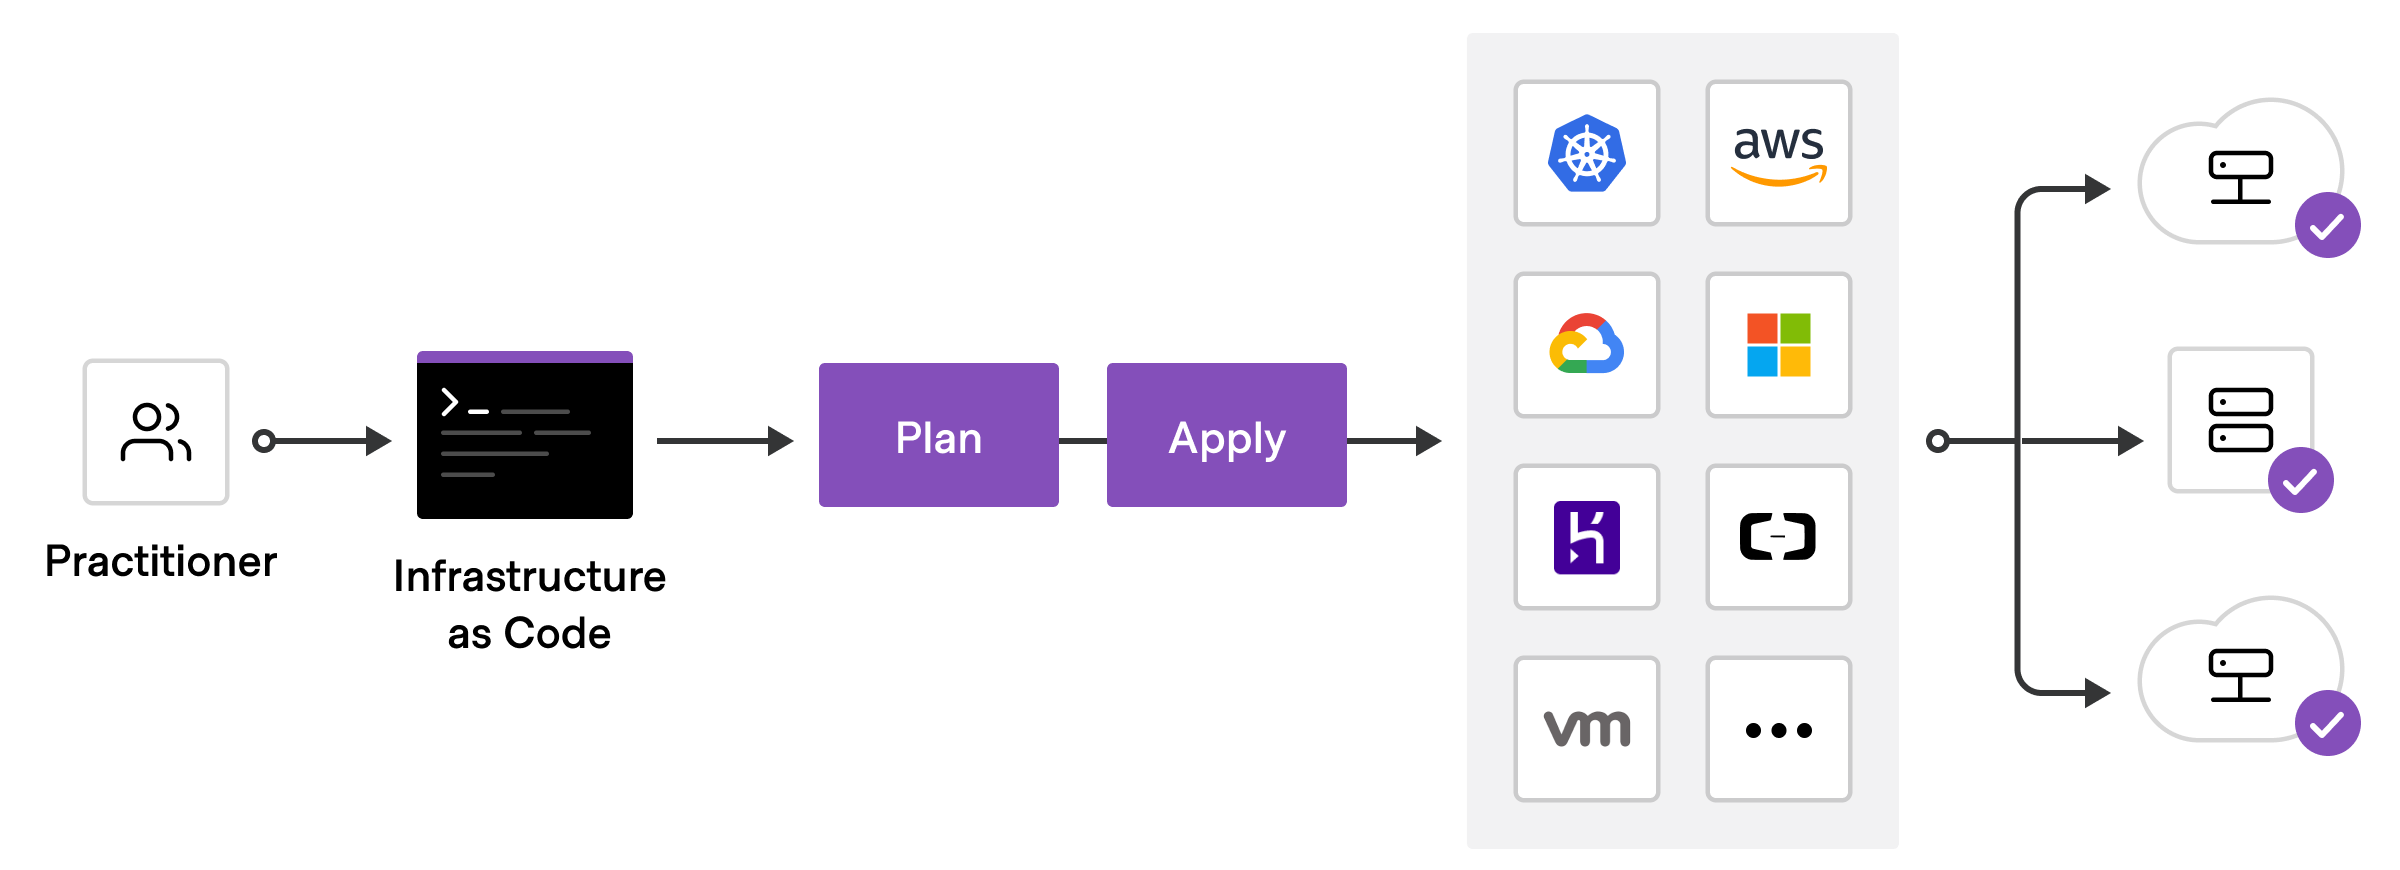
クラウドとオンプレミスのリソースを人間が読める設定ファイルで定義し,バージョン管理,再利用,共有することができる Infrastructure as Code(IaC)ツール.
Infrastructure as Code(IaC)とは
サーバーやネットワークなどのインフラ構成をコード化し,その構築や管理を専用のソフトウェアによって自動化する手法のこと.
Terraformはどのように機能するのか
TerraformはAPIを通じて,クラウドプラットフォームやその他のサービス上のリソースを作成・管理する.プロバイダを利用することで,TerraformはAPIにアクセスできるプラットフォームやサービスであれば,事実上どのようなものでも利用することができるようになる.

プロバイダの例
- Amazon Web Services (AWS)
- Azure
- Google Cloud Platform (GCP)
- Kubernetes
- GitHub
- Splunk
他のプロバイダについても,以下のリンクから確認できる.
Terraformの基本的なワークフローは以下の3つで構成されている.
1.Write
リソースの定義内容の記述.
2.Plan
既存インフラと,1での定義内容に基づいて,作成,更新,破棄するインフラを記述した実行計画を作成.
3.Apply
承認されると,Terraformは提案された操作を正しい順序で実行する.

AWS構築チュートリアル
以下2つを参考にチュートリアルを行う.
目標とする構成図は以下.

Terraformのインストール
Linux OSへのインストール例.
以下のコマンドを実行していく.
shell$ sudo apt-get update && sudo apt-get install -y gnupg software-properties-common
$ wget -O- https://apt.releases.hashicorp.com/gpg | \
    gpg --dearmor | \
    sudo tee /usr/share/keyrings/hashicorp-archive-keyring.gpg
$ gpg --no-default-keyring \
    --keyring /usr/share/keyrings/hashicorp-archive-keyring.gpg \
    --fingerprint
$ echo "deb [signed-by=/usr/share/keyrings/hashicorp-archive-keyring.gpg] \
    https://apt.releases.hashicorp.com $(lsb_release -cs) main" | \
    sudo tee /etc/apt/sources.list.d/hashicorp.list
$ sudo apt update
$ sudo apt-get install terraform
インストールできたか確認.
shell$ terraform -version
Terraform v1.3.5
on linux_amd64
タブ補完
コマンド入力時の,タブキーによるコマンドの自動補完を有効化する.
それぞれのシェル環境に合わせて,シェルの設定ファイルを作成.以下はBashの例.既存のものがあれば不要.
shell$ touch ~/.bashrcタブ補完パッケージのインストール.
shell$ terraform -install-autocomplete.bashrcファイルにコマンドが追加されていることの確認.
shell$ tail ~/.bashrc -n1
complete -C /usr/bin/terraform terraform
設定を反映.
shell$ source ~/.bashrcこれで補完機能が有効化された.
AWS CLIのインストール
Ubuntu20.04 にインストールした.
以下のコマンドを実行していく.
shell$ curl "https://awscli.amazonaws.com/awscli-exe-linux-x86_64.zip" -o "awscliv2.zip"
$ unzip awscliv2.zip
$ sudo ./aws/install
インストールできたか確認.
shell$ aws --version
aws-cli/2.9.1 Python/3.9.11 Linux/5.10.16.3-microsoft-standard-WSL2 exe/x86_64.ubuntu.20 prompt/off
AWS IAMユーザーのアクセスキーとシークレットキーを環境変数に設定.
shell$ export AWS_ACCESS_KEY_ID=YOUR_IAM_ACCESS_KEY_ID
$ export AWS_SECRET_ACCESS_KEY=YOUR_IAM_SECRET_KEY
リソース定義・コード実装
以下のリポジトリにソースコードを公開している.
作業用ディレクトリ作成・移動.
shell$ mkdir learn-terraform-aws && cd learn-terraform-awsTerraformでは,拡張子が .tf のファイルにリソースの定義を行う.
そのため,今回必要となる .tf ファイルを作成する.
shell$ touch main.tf vpc.tf ec2.tf各ファイルを編集していく.
Terraformのコードは,Hashicorp Configuration Language(HCL)というHashiCorp社製品で使われている独自の言語で記述する必要がある.
main.tf
jsonterraform {
  required_providers {
    aws = {
      source  = "hashicorp/aws"
      version = "~> 4.16"
    }
  }

  required_version = ">= 1.2.0"
}

provider "aws" {
  region = "ap-northeast-1"
}
terraformブロック
Terraformがインフラのプロビジョニングに使用する必須プロバイダを含む,Terraformの設定を記述する.source 属性にはオプションのホスト名,名前空間,プロバイダの種類を定義する.TerraformはデフォルトでTerraform Registryからプロバイダをインストールする.この設定例では,awsプロバイダのソースは hashicorp/aws と定義されており,これはregistry.terraform.io/hashicorp/aws の略語である.
required_providers ブロックに定義された各プロバイダに対して,バージョン制約を設定することも可能.バージョン属性は任意だが,Terraformが設定に合わないバージョンのプロバイダをインストールしないように,プロバイダのバージョン制約を設定することが勧められている.プロバイダのバージョンを設定しない場合,Terraformは初期化時に自動的に最新バージョンをダウンロードする.
より詳しい内容は以下を参照.
providerブロック
プロバイダ(この設定例ではaws)の指定をする.プロバイダとは,Terraformがリソースを作成・管理するために使用するプラグインのこと.
vpc.tf
json# VPCの作成
resource "aws_vpc" "sample_vpc" {
  cidr_block           = "10.0.0.0/16"
  enable_dns_hostnames = true
}

# パブリックサブネットの作成
resource "aws_subnet" "sample_subnet" {
  vpc_id                  = aws_vpc.sample_vpc.id
  cidr_block              = "10.0.1.0/24"
  availability_zone       = "ap-northeast-1a"
  map_public_ip_on_launch = true
}

# インターネットゲートウェイの作成
resource "aws_internet_gateway" "sample_igw" {
  vpc_id = aws_vpc.sample_vpc.id
}

# ルートテーブルの作成
resource "aws_route_table" "sample_rtb" {
  vpc_id = aws_vpc.sample_vpc.id
  route {
    cidr_block = "0.0.0.0/0"
    gateway_id = aws_internet_gateway.sample_igw.id
  }
}

# サブネットにルートテーブルを紐づけ
resource "aws_route_table_association" "sample_rt_assoc" {
  subnet_id      = aws_subnet.sample_subnet.id
  route_table_id = aws_route_table.sample_rtb.id
}

# セキュリティグループの作成
resource "aws_security_group" "sample_sg" {
  name   = "sample-sg"
  vpc_id = aws_vpc.sample_vpc.id
  ingress {
    from_port   = 80
    to_port     = 80
    protocol    = "tcp"
    cidr_blocks = ["0.0.0.0/0"]
  }
  egress {
    from_port   = 0
    to_port     = 0
    protocol    = "-1"
    cidr_blocks = ["0.0.0.0/0"]
  }
}
resource ブロック
インフラの各リソースを定義する.リソースを記述する場合は以下のようにする.
jsonresource "リソースの種類" "リソース名" {
  設定項目1 = 設定値
  設定項目2 = 設定値
  設定項目3 = 設定値
}
awsの各リソースの定義方法については,以下の公式ドキュメントで確認可能.
ec2.tf
shell# EC2インスタンスの作成
resource "aws_instance" "sample_web_server" {
  ami                    = "ami-072bfb8ae2c884cc4"
  instance_type          = "t2.micro"
  subnet_id              = aws_subnet.sample_subnet.id
  vpc_security_group_ids = [aws_security_group.sample_sg.id]
  user_data              = <<EOF
#!/bin/bash
sudo yum install -y httpd
sudo systemctl start httpd
sudo systemctl enable httpd
EOF
}
amiはAWSマネジメントコンソール上で事前にAMI IDを確認し,記述する.

user_data には,Webサーバ(Apache)をインストールし,起動させるスクリプトを記述している.これはEC2インスタンス起動時に実行される.
リソースの作成
以下のコマンドで設定ディレクトリを初期化し,設定ファイルに定義されたプロバイダ(今回はawsプロバイダ)がダウンロード,インストールされる.
shell$ terraform initTerraform has been successfully initialized! と出力されていればOK.
記述したコードのフォーマットを行う.修正されたファイルがあれば,そのファイル名が出力される.
shell$ terraform fmt記述したコードの構文に問題がないか確認する.
shell$ terraform validateインフラ構築を実行する.コマンド実行後,設定変更の差分が一覧表示される.
構成内容に問題がなければ, Enter a value: に yes と入力する.
最後に Apply complete! Resources: 7 added, 0 changed, 0 destroyed. と出力されていればOK.
shell$ terraform apply

Terraform used the selected providers to generate the following execution plan. Resource actions
are indicated with the following symbols:
  + create

Terraform will perform the following actions:

  # aws_instance.sample_web_server will be created
  + resource "aws_instance" "sample_web_server" {
      + ami                                  = "ami-072bfb8ae2c884cc4"
      + arn                                  = (known after apply)
      + associate_public_ip_address          = (known after apply)
      + availability_zone                    = (known after apply)
      + cpu_core_count                       = (known after apply)
      + cpu_threads_per_core                 = (known after apply)
      + disable_api_stop                     = (known after apply)

(省略)

Do you want to perform these actions?
  Terraform will perform the actions described above.
  Only 'yes' will be accepted to approve.

  Enter a value: yes

aws_vpc.sample_vpc: Creating...
aws_vpc.sample_vpc: Still creating... [10s elapsed]

(省略)

Apply complete! Resources: 7 added, 0 changed, 0 destroyed.生成されたEC2のパブリックIPアドレスに接続して,EC2インスタンス上でApacheが起動しているのを確認できればOK.(https://{パブリックIPアドレス}ではなくhttp://{パブリックIPアドレス}であることに注意)

リソースの状態確認
terraform apply コマンドを実行すると, terraform.tfstate というファイルが作成される.このファイルには,Terraformが管理するリソースの状態が保存されている.
以下のコマンドで状態を確認可能.
shell$ terraform show また,以下のコマンドで実行中のリソースを確認可能.
shell$ terraform state list
aws_instance.sample_web_server
aws_internet_gateway.sample_igw
aws_route_table.sample_rtb
aws_route_table_association.sample_rt_assoc
aws_security_group.sample_sg
aws_subnet.sample_subnet
aws_vpc.sample_vpc
リソースの削除
以下のコマンドで全リソースを削除する. apply 時と同様に,削除するリソースの一覧を確認し,問題がなければ Enter a value: に yes と入力する.
shell$ terraform destroy一部のリソースのみを削除したい場合は, tf ファイル上から該当箇所の記述を削除し,設定変更時と同様に terraform apply コマンドを実行する.
以上が一連の流れである.
余談
余談だが,GitHubで発表された2022年で急速に成長しているプログラミング言語ランキングで「HCL」が1位となっている.そのくらいTerraform,IaCの普及が著しい.(ちなみに「Rust」が2位.いつかRustについての記事も書く予定.)
